Every great photograph starts with the same foundation: an understanding of light, composition, and the tools that control them. Whether you are using a smartphone or a professional DSLR, the principles of photography remain the same. Mastering these basics is the fastest path from taking snapshots to making images you are proud of.
The most common mistake beginners make is focusing on gear rather than technique. A skilled photographer with a basic camera will consistently produce better images than a beginner with the most expensive equipment. This guide focuses on the skills that matter: exposure, composition, and working with light.
Understanding the Exposure Triangle
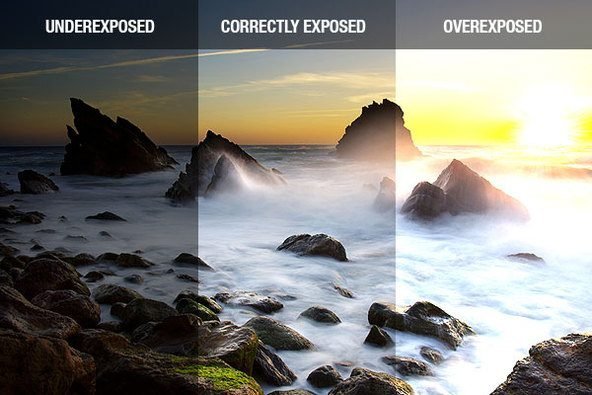
Every photograph is a record of light captured by a camera sensor. The exposure triangle — aperture, shutter speed, and ISO — represents the three variables that control how much light reaches the sensor and how the sensor responds to it. Understanding these three elements and how they interact is the single most important step in moving from auto mode to manual control.
Aperture is the opening in the lens that lets light through. Measured in f-stops (f/1.4, f/2.8, f/5.6, f/11, etc.), a wider aperture (lower number) lets in more light and creates a shallow depth of field — the blurred background effect that separates your subject from the background. A narrower aperture (higher number) brings more of the scene into focus, ideal for landscapes.
Shutter speed determines how long the sensor is exposed to light. Fast shutter speeds (1/500 second or faster) freeze motion. Slow shutter speeds (1/30 second or slower) create motion blur, which can be used creatively for waterfalls, light trails, or panning shots. The trade-off: slower speeds require a steady hand or tripod to avoid camera shake.
ISO adjusts the sensor's sensitivity to light. Low ISO (100-200) produces clean, noise-free images but requires more light. High ISO (1600-6400) allows shooting in dim conditions but introduces digital noise or grain. The rule: use the lowest ISO that your lighting conditions allow.
Ansel Adams, one of the most influential photographers in history, said: "You don't take a photograph, you make it." Understanding the exposure triangle is how you move from taking snapshots to making intentional images.
Composition: Arranging the Frame
Composition is how you arrange elements within the frame to create a compelling image. Strong composition guides the viewer's eye, creates visual interest, and communicates your intent. While rules are meant to be broken, understanding them first gives you the foundation to break them effectively.
The rule of thirds is the most fundamental compositional guideline. Imagine dividing your frame into a 3x3 grid. Placing key elements along the grid lines or at the intersections creates more dynamic tension than centering your subject. Most cameras offer a grid overlay to help you practice.
Leading lines are another powerful tool. Roads, fences, rivers, shadows, and architectural lines draw the viewer's eye through the image toward your subject. They create depth and guide the narrative of the photograph. Look for natural lines in your environment and position yourself to use them.
Negative space — the empty area around your subject — gives the viewer's eye a place to rest and emphasizes the main subject. Don't feel the need to fill every corner of the frame. Sometimes what you leave out is as important as what you include.
Working With Light
Photography literally means "drawing with light." The quality, direction, and color of light determine the mood and impact of your image. Learning to see and use light is a skill that develops with practice.
The golden hours — the first hour after sunrise and the last hour before sunset — produce warm, diffused light that flatters most subjects. The low angle of the sun creates long shadows that add depth and texture. Midday sun, by contrast, is harsh and creates unflattering shadows on faces.
Overcast days are actually excellent for photography. Cloud cover diffuses sunlight, creating soft, even illumination that reduces harsh shadows and makes colors appear more saturated. Portrait photographers often prefer overcast light for this reason.
Backlighting — placing your subject between the camera and the light source — can create dramatic silhouettes or ethereal, glowing effects. Side lighting emphasizes texture and depth. The key is to move around your subject and observe how the light changes from different angles.
Moving Beyond Auto Mode
Auto mode is fine for casual snapshots, but it makes all the creative decisions for you. To truly improve, learn to use your camera's semi-automatic and manual modes. Start with Aperture Priority (Av or A), where you control the aperture and the camera selects the appropriate shutter speed. This gives you control over depth of field without the complexity of full manual.
Once you are comfortable with Aperture Priority, experiment with Shutter Priority (Tv or S) for action shots, and eventually full Manual (M) for complete creative control. Manual mode is essential for consistent results in challenging lighting conditions like backlit scenes or night photography.
Practice is the only path to mastery. Take your camera everywhere, shoot in different conditions, and review your images critically. Ask yourself what worked, what did not, and what you would do differently. Over time, the technical decisions become instinctive, freeing you to focus on the creative side of photography.
Understanding White Balance and Color
Color temperature dramatically affects the mood of your photographs. Different light sources emit different color casts — candlelight is warm and orange, fluorescent lights are cool and green, shade on a sunny day is blue. The human eye automatically adjusts to these differences, but cameras need help to reproduce colors accurately.
White balance is the setting that tells your camera what is neutral white in the current lighting conditions. Auto white balance works well in many situations, but it can be fooled by mixed lighting or strongly colored scenes. Learning to set white balance manually — or shooting in RAW format and adjusting in post-processing — gives you control over the color palette of your images.
Beyond accuracy, white balance is a creative tool. A slightly warm color temperature adds warmth and nostalgia to portraits. A cooler temperature can create a moody, clinical, or serene atmosphere. The key is being intentional rather than letting the camera decide. Experiment with different white balance settings in the same scene to see how color transforms the emotional impact of your image.
For comprehensive photography tutorials, gear reviews, and community feedback on your images, explore Shutter Academy, where photographers of all levels find resources to improve their craft.